Powered by Blogger.

The Hippie Moose

Simple, Spiritual, and Sustainable Living.

I recently viewed a video on Facebook of a supermarket that creates no waste.  All of the containers are reusable and you simply fill, use, wash, repeat!


I was recently in Bulk Barn near my home here in Ontario and noticed a sign I hadn't seen before.


You see the Bulk Barn is already doing this whole thing and I never clued in!!!  So in case you're interested they have a page devoted to how it works.
BULK BARN Reusable-Container-Program

Kudos to the Bulk Barn for stepping up the no-waste game.


Here's where you can find one near you:

FIND A BULK BARN


September 01, 2017 No comments

UPDATE:  We have settled into a comfortable clothing number for us.  It's definitely more than 33 pieces but we've eliminated all the seasonal Rubbermaids in storage which gives us more storage space for everything else we love to do!!


On February 1st my husband and I embarked on the 333 Clothing Challenge.  The premise is to condense your clothes to 33 items for 3 months.  It took some sorting and a lot of purging but we both managed to pare our clothes down to 33 items.

Now, in the spirit of full disclosure... my 33 items does not include my shoes.  I figure this is my first shot at this and I'm taking some leniency on this issue.

This is the after shot of my closet.  My husband and I actually share a closet that's only 3 feet wide so it's nice to have some spare room in my 1.5 feet section!  I should have taken a before pic but just picture it packed and overflowing and you pretty much get the idea.


I'm just about half way through the challenge and at this point I don't miss anything.  I gave a lot of stuff away, I have a single rubbermaid in storage of the things I purged from my dresser/closet but couldn't bring myself to get rid of.  At this point it will be interesting to go through the stored clothes and see what I couldn't live without because I don't remember what any of it looked like at the moment.
If you're interested in trying this out the official Website for the Challenge is HERE it's the Be More With Less ~ Project 333.  I highly recommend giving it a shot.

Check out Life Your Way site for a free PDF printable to get you started:  https://lifeyourway.net/printables/project333.pdf 

Results so far:
Less laundry - I have less stuff so I'm more careful about washing things when they are dirty, not just because I wore them once.
Faster Mornings - I have less to choose from so it's simpler and quicker to pick something.
Dresser Top - I have enough space in my dresser for all my clothes now which means that heap of clothes that always landed on the top of my dresser because I was tired of trying to jam it in is now GONE!

Happy Purging! (And despite what my teenager thinks, this doesn't mean going wild one night a year - it means getting rid of the clutter that takes up time. space, and causes stress.)
March 12, 2017 No comments
Stuff can be a burden.  You have to find space for it, you have to clean it, you have to move it, you keep collecting it.  It's amazing how the amount of stuff you own seems to grow to fit the space you have, and even then it usually maxes out your real estate and you are either struggling to live around it or you're constantly moving it around.  I'm pretty sick of stuff.


2017 is my year to purge my crap.  The stuff that I have some odd sentimental attachment to and feel I can release to someone who would ACTUALLY enjoy/use it.  I still love the person who gave it to me.... I just don't have use for the gift anymore.  I don't feel like this is a statement on our friendship/relationship.  If someone was sick and tired of a gift I had given them I HOPE they would turf it out of their life and recycle it into someone else's who needs it.


To be clear... I'm NOT a hoarder.  I don't need an intervention or a team of helpers.  I just need to make it a priority.  I need to be more brutal in my evaluating process.  I know this because every year I attempt to purge and the following year the same crap is kicking around the house.... why did I let this item make the cut last year?  What value did I see in it?  Was I high?  What was I thinking?

This year I'm going to be more brutal with my process, less sentimental.  I'm no longer looking at it as losing things, I choose to look at it as liberating myself from things I don't need.

Item #1....
my waffle maker.
January 09, 2017 No comments
Do not let the title fool you.  I'm not having a good time.

We recently had a water holding tank installed here in the woods because of bad water in a well that was running dry.  For the first time in years I was going to be able to drink the water that comes out of my tap.  But with all things, few things go according to plan. The tank was finished mid December and I think we've had running water for approx. 8 days since.  I don't really want to talk about it.
Merry Christmas and Happy New Year to me.

If this ever happens to you you will need the following:
Your therapist on speed dial.
A decent sized bucket for putting water in the back of the toilet.
An outhouse if possible
A large pot for boiling water for dishes/ sponge baths. (The kettle doesn't cut it)
A crap ton of water jugs to fill at a good friends place or outdoor water tap. Preferably the type with a spigot. You can put them on counters for brushing teeth/cooking/etc.
A wagon for moving these half ton jugs once they are full.
Patience and a sense of humour.

Some other helpful items are:
A large bucket you can stand in while sponge bathing.  All that water that you used to clean yourself can now get scooped into the back of the toilet to flush it when it really needs it.

Small tub on your counter with water in it to soak dishes before you get around to doing them.  It makes the actual act of washing them easier and prevents the waste of people trying to rinse them off one at a time.

Small cups in the bathroom for brushing teeth.  You put a bit of water in the cup and keep dipping your toothbrush to get it wet/rinse it off.

A large bottle of merlot.  Just because.

This whole experience has me thinking about places that don't have clean water, places that are in drought and have to conserve every drop they have.  We really do waste a lot of water. It's also amazing how little water you need if you're disciplined about how you use it and re-use it.

Unless you live under a rock I'm sure you've heard of the fight at Standing Rock. The protest to stop an oil pipeline that would threaten the clean water source for a huge population including the
Standing Rock Sioux near Lake Oahe.  The pipeline is slated to run a mere 800m away from their Territory.
Now everyone knows how important water is, but I don't think people realize the logistics of not having clean drinking water. An experience like this reminds me how important it is to keep our water protected and safe.  We can't live without it.

January 04, 2017 No comments
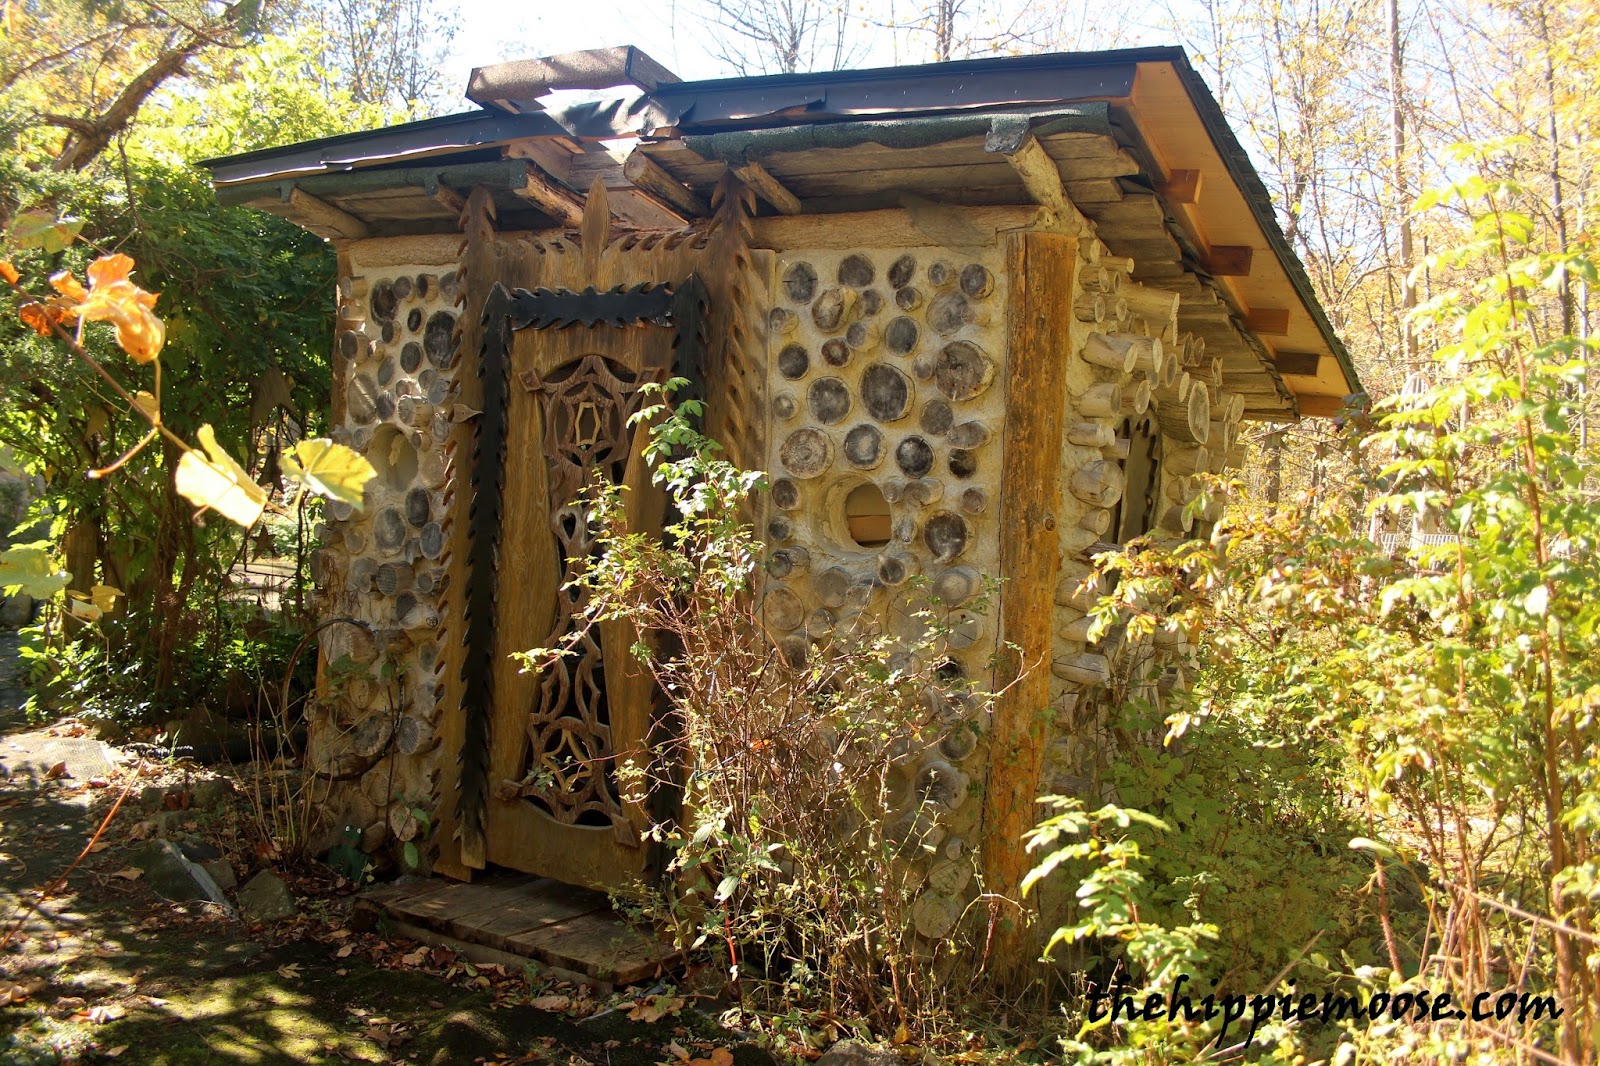
My husband and I took a trip to The Enchanted Forest Studio for the Westport Studio Tour.  Our friend David R. Maracle was playing and showing his sculptures.

The house, built by photographer Brian Mantrop, was simply amazing and I had to share some pictures.  He built it from the ground up using tons of recycled and repurposed materials.


Faithful dog guards the apple basket.


The house is 4 levels, the main floor living area, office area, and two bedrooms.

There are amazing outbuildings on the property that serve as studio's and sheds.


Kathy Cashman's studio, she makes amazing clothing!


The front porch of the main house, including a stone seating area for your morning coffee....


 The main living area, tons of windows let in natural light.


 The amazing woodwork comprising the ceiling on the main level.


If you ever get a chance to visit this amazing place I promise you won't be disappointed!
October 15, 2014 No comments
I remember when suet cakes were less than a dollar each.  I realize I sound like some old woman complaining about the price of gas, but seriously!

If you are cheap like me here are a few easy steps to feed those ravenous winged creatures outside.  The ones who even now are making enough noise to wake the dead because my suet is chilling in the fridge...

All you need is some fat ~ I use bacon fat.  I never throw out bacon drippings, it's something I learned from my grandmother and I could never shake it. I let them cool a bit and spoon them into a mason jar that is always in the back of my fridge.

Where were we?  Right, suet for pig-birds.

3/4 cup bacon fat (approx.)
1/2 cup peanut butter (anything you have, they are NOT picky)

~Melt these together.  (I often just use the big fry pan I used for the bacon, that way I only have to wash it once.)

6 cups wild bird seed (approx.)

~Mix in enough wild bird seed to fill the pan but you can still see a fine layer of liquid over the top.


Use a big spoon to put into containers.

I kept all my old suet containers so I just re-use those.

If you don't have anything that shape you could cut off the bottoms of old milk cartons and fill those. They are waxed and pop out easy once the suet is chilled.

When looking online for a recipe with more precise amounts I came across this one:

Suet Cake

  • 2 parts melted fat (bacon fat, suet, or lard)
  • 2 parts yellow cornmeal
  • 1 part peanut butter
Mix all ingredients together and cook for a few minutes. Pour into small containers (tuna fish cans are good), and refrigerate or freeze until needed. Mixture can also be stuffed into 1-inch holes drilled in small logs to hang from trees. The recipe can be made all year long as long as you accumulate fat. Fasten containers securely to trees or feeders.


Follow my blog with Bloglovin
March 30, 2014 No comments
We have two dogs that don't respect the "Don't sleep on my bed" rule, OR the "don't drink out of the toilet" rule, or the "don't chew up my lego" rule.  For that reason we found it necessary to put a piece of plywood across the bottom of the stairs to keep them from sneaking up.


The problem with a piece of plywood is that it typically doesn't stay standing by itself so I had to prop a chair beside the plywood, beside the staircase.  You get the idea.  A lot of crap at the bottom of the stairs and everytime I wanted to go up or down I had to hop this fence of assorted "stuff". It got irritating. Anyone who visited over the summer can tell you how hideous it looked.

I figured it was time to make something more permanent.  It took a few pieces of 1"x6" and two hinges but I finally have a permanent "keep off my bed" gate!

It only took a few hours

I got the original idea from this website:  http://www.remodelaholic.com/2012/09/diy-barn-door-baby-for-stairs/

The plans were for a baby gate but I used the general idea, scrapped the closing mechanism, and voila! When we installed it we tilted it slightly so it always swings closed.  The cats have actually figured out how to push it open and run through before it closes on their tails.
January 20, 2014 2 comments
It's FREEZING.  Like minus 30 degrees freezing. So last night I whipped this up for the front door where it seemed we had some cold air leaking in. Probably because the wind was at 100 km/hour.


SO simple... just some left-over polar fleece stuffed with foam, fibrefill and marbles to make it heavy and hug the floor. It probably took about 10 min to make. The cat slept at the front door this morning for the first time.... ever.
January 07, 2014 No comments
Today was Chili Sauce day. It's not a favorite day for my family but it's one of those necessary days every year.  Tomorrow is Chili Sauce Day Take 2.  Also not popular.

This morning I dragged my faithful family to the farm down the road to pick roma tomatoes.  We picked 1 bushel... well three of us did, the other one wandered around looking for bugs and avoiding any manual labour.

Said bug hunter redeemed himself by spending an hour chopping onions, peppers, and helping me skin what seemed like a million little red lava bombs.

All for this....

Here's how to make your own!

Steph's Chili Sauce (adapted from Cindy's!)
6 onions chopped
1/2 bushel tomatoes
3 green peppers chopped
3 red peppers chopped
4 cups vinegar
2 cups white sugar
2 cups brown sugar
8 gloves garlic, smashed
1/4 cup pickling spice

I always blanch my tomatoes and remove the skin.  Then I dump it all into a huge stock pot, bring it to a boil, reduce and simmer until you have about 1/2 left. (a few hours).  Can it in jars.  We eat it all winter with nacho chips, or sometimes it's my base for pasta!  Love it!!


September 19, 2013 2 comments
I have a new kitchen table!! I'm so excited! 

For a long time we have had a round white table that was a hand-me-down from our neighbors from 4 years ago. We also have a hand-me-down table from some good friends that I actually stole out of the dining area for my sewing machine.  So we were stuck with the round white table that only seats 4 and the one leg kept falling off which made dinner more exciting because you never knew when that puppy was going to start to tilt! 

Anyway.  I looked into new tables and I have got to tell you, I'm not sure what these people are thinking.  Slapping 4 legs onto a piece of laminated particle board should NOT cost me in the hundreds of dollars.  Maybe it's just me.  SO enter Super Husband.  I made my little drawing, dragged him to Home Hardware, and went to work.  (I know, I'm a little demanding).  I was a LITTLE worried about this unsupervised activity.  Compounded by the fact that the boys were helping with it.  Here are some of the things that flew threw my mind during my more doubtful moments....

Not what I had in mind...

It's bad enough I step on it, I shouldn't have to eat off it.

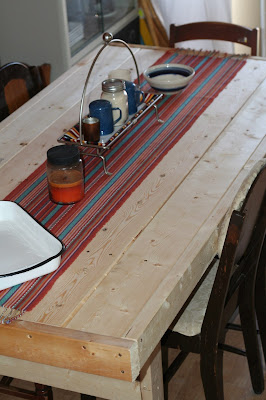
I should never have doubted.  This is my NEW table and I'm in love with it!  It seats 8!  We have already had people over for dinner which has not happened in a long time!

I LOVE it!

 
We spent $70 on wood but I got my table AND a storage bench which I still need to take a picture of.  Take THAT, overpriced particle board with legs, I don't think so!

For those wondering I kept the white table of doom and put it in the greenhouse to hold my pots and trays.  If I come up with a more creative use for it I will let you know.
April 04, 2013 2 comments
OK, maybe not bliss. More like, "stink I'm glad that's done!".  I just finished our budget for 2013.  Yes I realize it's Feb.  Yes, I realize I'm late, but let's look at the bright side, I don't have to do it again until Feb 2014!!  Silver Lining Baby!


If you are interested in doing a budget for the year and discovering where your money disappears to in a puff of smoke... trust me it's not ACTUALLY flying out the front door every time you open it like your Dad used to tell you. And now that the Canadian money is all plastic it really DOESN'T grow on trees!!

Anyway.  A few great resources for budget starting:

Dave Ramsey has got some great downloadable forms to use: http://www.daveramsey.com/tools/budget-forms/

I LOVE Gail!!  She doesn't sugar-coat it!! :
Here is an article on how to go about doing  a budget: http://www.gailvazoxlade.com/resources/guide_to_building_budget.html
Here are a bunch of online forms etc. to help you:
http://www.gailvazoxlade.com/resources.html

Good Luck! 
February 07, 2013 2 comments
My husband found me a new compost bucket!  I'm pretty excited about not having to use the bucket with a pie plate stuck on the top.  Don't get me wrong, it worked, just not well.  So after a month of looking....

my circa 1960's ice bucket/ compost bucket...

October 11, 2012 No comments

From Organizing Junkie's Pinterest Page!
I just recently discovered "I'm an Organizing Junkie!"  I love stalking this site!  I have a bit of a clutter problem at the moment and I'm trying to tackle it one room at a time.  I just recently repainted and reorganized my room, I will post some pics.  If you read the post from yesterday about my apple crates, stay tuned, I will post pictures when I figure out how I'm going to incorporate them into my organizational plan!

Here is the organizing junkie's Pinterest page!  I love pictures and I love being organized... this site is  Nirvana!

September 26, 2012 2 comments
I have been meaning to make ketchup for quite some time.  I ran out the other day and since necessity is the mother of invention, I was gave it a shot.

I got my recipe here: http://www.instructables.com/id/Ketchup-Catsup-Recipe/

I didn't have any allspice but other than that I followed the recipe (my agave nectar wasn't blue, it was Light Madhava).  I really liked it and more importantly I put it in an old ketchup bottle, threw it in the fridge, and the kids didn't notice a difference.  Bonus.

I like the fact there is no corn syrup in it, I can pronounce all the ingredients, and I can control how much sugar/salt it contains!

September 18, 2012 1 comments
We have a new composter for our kitchen waste!!  So exciting!  We have two other composting systems, both of which we built ourselves.  The first is for dog waste.... it consists of a buried garbage can with the bottom cut out and a lid.  We fill it up with the obvious items and sometimes add the ashes from our fire pit to keep the smell down and dry it out.  It works.
Our final composter is for yard stuff and consists of some skids we got for free, nailed together into a square box for anything that doesn't fit the other two!
April 07, 2012 1 comments
My friend Wendy sent this to me and I have to say I'm lovin it... try it out, it works, and we can all use more bags to lug our mommy stuff around in, I mean really.

July 15, 2010 2 comments
For all those coming to visit... I have some excellent news.  Our outdoor shower is set up, so no fears of spotting naked bathers on the driveway if we don't know you're coming.  The local wildlife is also pleased with our new found modesty!
Here it is..

You might be asking yourself... where do you get a shower curtain that big.... well, I'm glad you asked.  It's actually a canvas painting tarp that we got at the hardware store.  I had to cut in half and sew it back together to make it skinny and long, instead of a huge square.  Then I added big grommets to the top to put hooks through.  The poles are obviously from the property and we had the rope lying around.  Overall I think the whole thing cost about $20.
So grab your favorite biodegradable soap (or borrow some of ours)  cause' there's nothing like showering with the birds chirping and the sun shining.
June 28, 2010 3 comments
Well the back window of our pick-up cap is finally fixed.  I'm not going to point any fingers but SOMEBODY was driving the truck with the window up and smashed it out.  The sound could be heard for miles and was akin to a grenade going off.  Needless to say.... no more window.

We looked into buying a replacement window.... and looked at the guy at Truck World as if he had just lost his mind.....  You want HOW MUCH for a piece of glass?  Did you blow it yourself?

We looked at getting a new cap on Kijiji (where we found our current one) and found some nice deals but I would have to REPAINT, and WASTE the one we have.... that seemed pretty wrong.

SO..... we made one.  Perfect...it is not.  Functional... yes.  Funky.... FOR SURE!

Pictures....ok:

In process....

Glue is drying....


Installed and painted.

I don't know how long it will last, but for now it works.
May 22, 2010 6 comments
This past week I did a lesson with the boys on how to make butter. Originally I was going for a straight imparting of information but it turned into a bit of a science experiment. You see I bought the wrong dairy product. I reached for whipping cream and came away with table cream. I didn't realize my mistake until we were well into it so I had to think fast to redeem myself. I guess I could have said "hey look, I bought the wrong thing!" but why? After our first run we got our hands on some whipping cream and did it all again!

First experiment (500 ml Table Cream): Shake time: 40 min. Butter achieved: about 1/4 cup.


Second experiment (500 ml whipping cream): Shake time: 14 min. Butter achieved: about 1 cup.


We made a few loaves of bread with the buttermilk and had daddy help us with a taste test to round out the experiment.

For those who would like to give this a try, you will need WHIPPING CREAM (learn from my mistakes people), a big ol' mason jar with lid... or other seal able container which allows lots of shaking room (the more space, the faster the process), a bowl, a wooden spoon, and a sieve to drain off the buttermilk from the butter.

Pour milk into the jar. Shake like crazy. You will eventually get whipped cream... keep going. As soon as the liquid separates from the milk solids you're golden! Pour it all out into the sieve, KEEP THE MILK (it's great for making bread, biscuits, pancake batter, etc.) Plop your butter into a bowl, take a wooden spoon to it to extract any remaining milk... and presto! You can stir in a pinch of salt if you like, or go unsalted.


January 31, 2010 4 comments

Here is the recipe I use with the boys for bread... I think they have made it enough times to almost be able to do it solo! (It's from the book: "From Amish and Mennonite Kitchens" by Good and Pellman). This goes out to fellow homeschool mama Jordin!


White Bread


1 pkg dry yeast (2 1/4 tsp.)


1/2 cup warm water


1/3 cup sugar


2 tsp salt


2 cups warm water


2 1/2 tbsp. melted shortening


6-7 cups flour


1. Dissolve yeast in 1/2 cup warm water.


2. In large bowl combine sugar, salt, water, and shortening. Add yeast mixture. Gradually add flour to form a soft dough. Turn onto floured surface and knead until smooth. Place in greased bowl. Cover and let rise 2 hours. Punch down. Divide into 2 portions and form loaves. Place in greased bread pans. Prick tops with fork. Let rise until higher than pans (1 1/2 - 2 hours)


3. Bake at 375 degrees for 25-20 minutes. Cool 10 minutes. Remove to cooling rack. You can brush tops with butter if desired.


My FAVORITE bread recipe is posted HERE but is a bit more labour intensive and not appropriate for kids because of the boiling water.

A while back Mother Earth News did some articles about No-Knead Breads.... I really want to try this one.... I will let you all know how it goes...

Easy, No-knead Crusty Bread
January 19, 2010 9 comments
Older Posts

About Me

The Hippie Moose
View my complete profile

Follow Us

The Hippie Moose

Labels

about us art art truck books cake Camping canning cooking crafts Creativity crochet December Photo Project decluttering diy dreadlocks family finances food gardening gluten free green cleaning Health homeschooling inspiration kids Kingston 4 paws knitting live life outside me music Native off-grid our property painting path to minimalism pets photography pictures Pirate Day Powwow PTDS quilting service dog sewing simple living stuff I LOVE sustainability tattoos thrifty stuff upcoming events vegetarian water

Blog Archive

  • ▼  2019 (1)
    • ▼  March (1)
      • No He's Not Blind, And Other Random Questions
  • ►  2017 (4)
    • ►  September (1)
    • ►  March (1)
    • ►  January (2)
  • ►  2016 (1)
    • ►  July (1)
  • ►  2015 (3)
    • ►  December (1)
    • ►  September (1)
    • ►  January (1)
  • ►  2014 (17)
    • ►  December (1)
    • ►  October (1)
    • ►  September (1)
    • ►  July (1)
    • ►  June (2)
    • ►  April (2)
    • ►  March (4)
    • ►  February (1)
    • ►  January (4)
  • ►  2013 (47)
    • ►  December (21)
    • ►  September (3)
    • ►  July (1)
    • ►  June (2)
    • ►  May (2)
    • ►  April (5)
    • ►  March (1)
    • ►  February (5)
    • ►  January (7)
  • ►  2012 (23)
    • ►  October (2)
    • ►  September (6)
    • ►  August (2)
    • ►  July (6)
    • ►  April (4)
    • ►  January (3)
  • ►  2011 (18)
    • ►  June (2)
    • ►  May (2)
    • ►  April (4)
    • ►  March (1)
    • ►  February (2)
    • ►  January (7)
  • ►  2010 (68)
    • ►  December (17)
    • ►  November (3)
    • ►  October (6)
    • ►  September (6)
    • ►  August (3)
    • ►  July (6)
    • ►  June (5)
    • ►  May (5)
    • ►  April (3)
    • ►  March (5)
    • ►  February (2)
    • ►  January (7)
  • ►  2009 (79)
    • ►  December (27)
    • ►  November (9)
    • ►  October (5)
    • ►  September (5)
    • ►  August (3)
    • ►  July (6)
    • ►  June (6)
    • ►  May (8)
    • ►  April (4)
    • ►  March (5)
    • ►  February (1)

Sitemeter

FOLLOW ME @INSTAGRAM

Created with by ThemeXpose | Distributed By Gooyaabi Templates